
I recently met up with Theo and Bee from The Indie Projects, who came down to Dartmoor to interview me about my self built Vauxhall Movano camper van.
I have been subscribed to Theo and Bee’s YouTube channel for a number of years, and have followed their European travels in their VW T4 van with interest.
When they approached me about a feature on my van I was thrilled. I knew from watching their YouTube channel that Theo was an accomplished film-maker and photographer. So emails were exchanged back and forth, and the date and location was set.
Filming the van on Dartmoor
I met Theo and Bee at Haytor on Dartmoor, and then proceeded to take them to a smaller, lesser known tor called Bonehill Rocks. It was much quieter there, which was suitable for filming the interview and getting the associated shots and photos. The day was perfect, good light and no wind meant that we could get some drone footage of the van on Dartmoor.

Theo and Bee were keen to show off the rustic interior of the van which I had self built over the course of 4 months in 2016. I spent many hours pouring over photos and videos of other peoples vans, and in the end I knew the kind of rustic wooden interior that I wanted for my own van. Having said that, when I started the build I never quite expected it to turn out as well as it has ;)
Vanlife TV YouTube Channel
From the start of the project I knew I wanted to document the van build process on my Vanlife.tv YouTube channel. I wanted viewers to see how I carried out the work, and try and help them if they wanted to do a similar thing to their own vans.
I think I achieved this, as I get many comments and emails saying my videos were of great help and inspiration. This feedback makes the many hours of work, filming, editing and uploading worthwhile – as its great to know other people find it useful! :)

So with the filming and photographs out of the way, we concluded the day by going for a meal at the pub at Widecombe-in-the-moor, which is situated just below Bonehill Rocks. The 5 hours of filming is condensed into the 11 minute video above, and I think you will agree, Theo and Bee have done a fantastic job!
So a massive thank you to Theo & Bee for featuring my van on their YouTube channel!
If you want to follow The Indie Projects here are the links you need:
- The Indie Projects on Facebook
- The Indie Projects on Twitter
- The Indie Projects on Instagram
- The Indie Projects on YouTube
- Or visit The Indie Projects website
Beautiful Rustic Self Build Van Tour
Video Transcript:
I spent a lot of time down in Portugal living out of a Mitsubishi Delica and I’ve had vans probably getting on 15 years that I’ve been living in and out of vans, surfing and travelling around doing stuff like that.
My name’s matt and this is my self converted van. It’s a Vauxhall Movano medium wheelbase and it took me around four months to convert it from a basic panel van into what you see today.
The reason i chose this van there’s a couple of prerequisites.
I wanted to be able to stand up that was the main thing. I had a couple of vans in the past where just crouching down wasn’t going to do it anymore so I wanted to stand up and I didn’t want a short wheelbase
I needed to fit the van to the area where i spend most of my time, and that is on Dartmoor. The lanes are small, so i wanted something not too big, but not too small at the same time, so medium wheelbase which i have here fitted the bill nicely. But it did take me at least two months to actually find the right van.
Right so let’s start off with the bed it was the first thing that I built in the van. I wanted a raised bed, permanent bed so that I can store my bouldering equipment and ropes and other bits and pieces underneath the bed. So there’s lots of storage underneath the bed that you access from the rear doors.
The base of it is actually built with pallet wood. So there is three horizontal members going from side to side which sit on to strengthening members that were already in the construction of the van. Then just lined it with pallet wood. On top of that is a four-inch piece of foam like that which I got from a foam shop in Plymouth. it was 90 quid for the foam, it isn’t cheap. Just for this 1.75 meters by 1.4 meters was 90 quid, but it’s really comfy so I can’t really complain about that.
When I was looking for a van, I was looking at ones that were already done but I couldn’t find one quite how I wanted it. So it was a case of, you know , I’m going to buy a bare van and I’m going to kit it out exactly how I want it for my needs.
So obviously I do a lot of climbing and bouldering, I have to carry a lot of equipment and it stays in the van all the time so it lives underneath the bed here. So a lot of the ones that I looked at that were already made, there just wasn’t the amount of storage for ropes and bouldering pads and equipment like that. But yeah it was it was daunting undertaking a self build that’s for sure
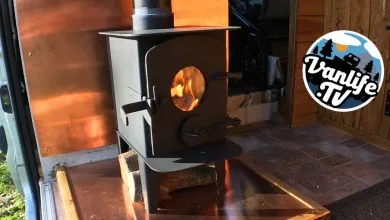
I played around with a couple of ideas of where to put the wood burner. I possibly was going to put it here but was concerned it was too close to the bed so I put it right next to the side door.
It took a lot of planning to actually get the wood burner in. The actual installation of it didn’t go too bad it was pretty straightforward. But what you didn’t see on some of my videos was the hours of planning that actually went into sourcing the different bits and pieces that I needed, and the research because I wanted it to be really really safe.
So looking at the back of the wood burner here I have three millimeter aluminium and that is spaced it off of some Hardiebacker board which is like a fireproof board that I got from B&Q.
I wanted to put in a very good fire break between the wood burner and the passenger seat, so I’ve got 1 inch spaced aluminium and then Hardiebacker so it’s it’s super safe. It works really well, I can tell you, when that wood burner is on you can actually put your hand right onto the aluminium and it doesn’t even feel warm. So it’s actually doing its job the air can flow both sides of the aluminium and take any heat away.
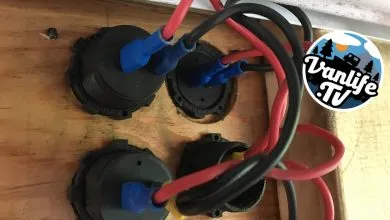
So after I fitted in the wood burner, then it was powering everything in the van. So the whole system for power is all located here. I have a hundred watt solar panel on the roof and that comes into this charge controller here, and that flashing green lights telling me that the battery is fully charged.Then a little control panel there, I’ve got 14.4 volts on the battery at the moment that’s coming from the solar panel. Then I have some USBs here I have USBs at the back of the van as well so that I can have the phone next to me charging overnight when I’m in bed.
Then I have the fire extinguisher, the most important thing having a wood burner in I had to have a fire extinguisher. So that’s a dry powder fire extinguisher and I made sure that it was the right sort for a wood fire.
Probably getting on 15 years I’ve been living in and out of vans, surfing and traveling around doing stuff like that. But when I come on to YouTube it was when I had a Volkswagen Transporter T4. It soon become clear to me was slightly too small, I had bouldering pads and equipment I need to get in it plus everything else.
I then went on to a Talbot Express motor home which had loads of space, it had toilet and a shower. I loved all the space that it had in it, it had one major problem. Where I spend most of my time is on Dartmoor, and it was seven foot wide and some of the bridges on Dartmoor are width restricted to six foot six. Which meant massive detours around some really small tight lanes. If I come up against another vehicle it was a nightmare trying to pass another vehicle in the lane.
So that was what made me think I need to go back to a panel van, but I need something that was small enough for the lanes, but big enough to live in hence; I have a medium wheelbase high-top van here today.
So after putting in the bed, it was a case of putting in the bench seat. It provides a step to actually get up onto the bed, but also somewhere to sit down as well to have a meal. I put in a swing-away table as well, and once that was in, then I could concentrate on putting the kitchen area in, which is everything that you see here.
The only pieces of bought wood that you see, is the wooden work surface which was from Homebase and then this square timber here just to build the frame. All of the rest is just pallet wood that I sourced from my friend’s work. If I open it up, I haven’t even stained the other side, so you can actually see how easy it was just to make a a door. All the hinges that you see there was 10 quid from a DIY shop so that was pretty simple to put together.
Now I don’t know if or anybody had actually watched my video on how I fitted in the sink and the two burner ho. I actually made a complete hash up and a mistake on following the template of dropping this in, so I’ve had to do a couple of modifications to get this to fit in because I cut the wrong size hole! But it’s all in place and it’s all working there. So I’ve got sink and a two burner gas hob.
The lighting is just two simple little lights. They’re actually LEDs and it was from a boating shop. These are actually solid brass and there’s a little LED light in there and that runs from here and I’ve got one in the back of the van as well. That all runs into a distribution board/fuse box that is kept in this cupboard here.
At the bottom of this cupboard there’s a leisure battery and all the electrical equipment runs in there. It’s just simple little LED lighting. If I don’t want the full light, I do have some warm white fairy lights which I’ve got on a remote control as well so they just give a nice little ambient light instead of a bright LED.
Moving on to the outside of the van here, and in the back you can see here’s my two water tanks. So that’s a total of 40 litres there, and then my waste water tank is just tucked in there. Then the rest of my junk, so we’ve got my rucksack, and there’s a bouldering pad there, there’s climbing shoes and walking shoes, ropes.
In here I have a pressure washer. I can use it as a shower for myself, but anything that needs cleaning I can use this pressure washer here. It’s seven litres about 25 quid off of Amazon. So that is a handy addition to the van, that always stays in the back of the van here.
Then the latest addition to the van is this rear window. As you can see it’s still work in progress, I only fitted it about two or three days ago. It is scary cutting metalwork in your van, but as long as you measure lots and lots of times make sure you get absolutely right. It’s just a normal motorhome window. The wood that you see around it here, is just the spacer from the white inside to the black outside part of the window. The two clamp together around this wood spacer here and now all I’ve got to do is just finish it off with tongue-and-groove wood and that will finish it off nicely. So a bit of extra light into the bed area at the back of the van.
I don’t want to put myself into years of debt buying a house, even though I’d love to own the house, I’m not prepared to go into debt for it. You know I’ve always wanted a place to live in the country and this is what you see here. I’ve tried to get it as like a little country home type thing where I can actually live in the country, but I’m living out of a van.
So it’s just it is a cheap way of living. You know even if you’re renting at 500 quid a month, you move into a van – well immediately you’ve saved yourself 500 quid and you’ve just got to fork out for a bit of fuel, insurance and tax.
It’s the freedom that comes with it. If I don’t want to move on and I don’t have to. I can open up the window and if I want to it could be a different view every morning. Coming from a surfing background, I’ve spent a lot of time in vans in Cornwall, in France, in Portugal, and it’s just a great way to meet people as well.
Even when I’m parked up here on Dartmoor, there’s people walking past going “oh wow look at your van!” Then they want to know everything about it. So its a great way of meeting people as well!


Great videos and inspirations – thanks for uploading. Am picking up a van of my own for conversion next week and have had people tell me a cordless drill is no use when fitted with a hole saw for drilling body panels/woodwork unless they’re a 4Ah battery, what the battery rating on the drill are you’re using as it easily handled the vent you fitted below your woodburner? Cheers.
P.S. Tried asking this on your youtube channel but my comment wont show up no matter what the settings are.
Thanks Steve – the rating on the battery is 18 volts, 3.0Ah, 54Wh
Nice one, thanks!
I had my lass post this question on your youtube channel, for some reason it wont let me post comments, in case you were wondering why you’re getting the same questions from different folks!