
One of the most common questions I have been asked via social media and email has been how did I wire up my USB/volt meter/cigarette lighter panel in the van.
As the demand seemed to be out there for wiring instructions, I thought it was about time to write a small article and produce a video on how I wired everything up.
So lets kick things off with choosing a USB panel for your van.
Which panel?
Firstly, there are a whole host of different camper van USB and volt meter panels on the market. They are all very similar, but the 12 volt wiring has to be adjusted depending on what panel you have. The easiest place to source your own panel is to do an eBay search for “camper usb”, as this is where I found mine.
Building the wires


My setup

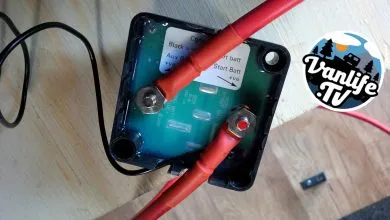
Looking at the photo above, here’s an explanation of what’s going on: (or watch the video at the top of the page)
- The red positive wire comes from the battery, via the fuse box, and into the switch (bottom right)
- From the other terminal of the switch, there are 3 positive wires into one spade terminal – each going to its own device (volt meter, usb, cigarette socket)
So when the switch is on – it feeds all 3 devices at once. - The negatives are the same – look bottom left – all negatives join into one spade terminal – with the black wire returning to the battery earth in the bottom right of the pic.
Fuses
It is important to make sure the fuse is the correct size. The fuse must be the weakest link in the circuit, and it must protect the device and the wire. The fuse rating has to be smaller than the wire rating – but higher than your expected combined current.
So taking my set up as an example, the two USB ports that I have can draw a combined current of 3.1amps. I have 10amp wire, so I have fitted a 4amp fuse feeding all of those components (usb, cig lighter and voltmeter). So the fuse is rated higher than the combined current of the two USB ports, but lower than the wire rating. So if there is a spike in current, then the fuse will blow at 4 amps, protecting the wire and the component.
There you have it, I hope the video and photos help to explain how I have wired the panel in. If you have any questions or comments, you can leave them in the comments section below (or on the Youtube video) and I will do my best to help.


Hi, top vid of the wiring details. Where did you get the on off switch for the panel?
Thanks Tim
It came as part of the panel. But its just a normal 10amp switch that you can get from Maplins or eBay.
Hi
Might be a really daft question but what size hole saw bits did you use?
Cheers
Thanks for that exactly what I was looking for :))
Hi – do you not need an earth for the switch itself too?
The switch can be earthed and the little light on the switch will come on. I didn’t bother as the voltmeter will indicate when everything is “live”.
I am trying to install this switch panel onto a boat. How do I install a fuse or fuses that would protect the switch panel and the devices that are plugged into it?
Thanks.
What amp wire did you use to create the circuit between the components? Did you use 10 amp wire as you did from the battery feed, or a lesser amperage?
Hi,
for a total novice, what fuse and wires are used?
Thanks!
Hi
Ref fuses,m.
You say your combined usb use is 3.1 amp.
What about the cigarette socket beside it,does it need to be added to the calculation?
P.s really appreciate the above tutorial
What gauge wire did you use?
Very helpful info-Thanku!