
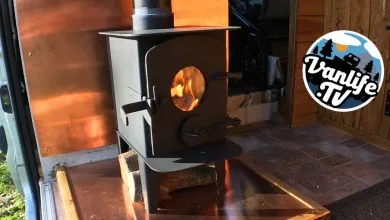
Having completed the camper interior of the van, it was time to hook up a second battery to provide power in the back of the van. To install a second battery, or leisure battery as it is commonly called, you need to wire it in with a split charge kit.
This is how I went about fitting it in my VW T4 van.
What is a split charge kit?
A split charge kit consists of a special relay that joins both batteries together (the main starter battery and leisure battery) when the ignition is on and the engine running. This charges both batteries at the same time.
Now, when the engine is off, the relay disengages and separates the two batteries. This means you can run accessories like a fridge, tv or lights from the leisure battery without worrying about discharging the main vehicle battery. This means you can start your van again in the morning.
What kit did I buy?
I purchased a complete split charge kit for a T4 van off an eBay seller called “simplysplitcharge” for about £70. It came with everything I needed to do the job – wires, cables, fuses and fuse holders – all with the correct terminals attached so it is ready to go. The relay is a Durite voltage sensitive relay, rated to 140 amps.
What is a voltage sensitive relay?
A voltage sensitive relay does what it says on the tin! It senses the voltage, so when the engine is on, the alternator will be charging the battery’s and the output will be around 14 volts. The relay will detect this, and join the two battery’s together so both can be charged. My relay cuts in at 13.3 volts.
When you switch off the engine, the alternator stops charging the battery’s, and the voltage will fall to around 12 volts. The relay will detect this, and disconnect the two battery’s. My relay disconnects at 12.8 volts.
Installation into the VW T4 van
The first thing you need to do is decide where you want to place your leisure battery. Some people fit the leisure battery under the driver or passenger seat, others fit it at the rear of the van, just inside the back door. I chose just behind the drivers seat, as I had some left over space from the bed installation.
As the kit came ready made, installation is fairly straight forward, but for me it did involve removing the double passenger seat and lifting the rubber flooring to run the cable into the back of the van. To get the cable through the bulkhead, I pushed it through an existing rubber grommet, near the battery under the bonnet. You can see this in the photos below.
The kit has two 100 amp fuses, 1 for the main battery, and one for the leisure battery. These will protect the battery’s and the relay in case of a overcharge in the system caused by the alternator. The instructions that come with the kit are superb, just make sure you follow them correctly and you’ll be fine!
The wiring sequence is as follows:
Main battery –cable– fuse –cable– relay –cable– fuse –cable– leisure battery
With main cable in place under the rubber flooring, I installed the first fuse holder on the bulkhead under the bonnet. The second fuse holder was installed on the woodwork near the leisure battery.
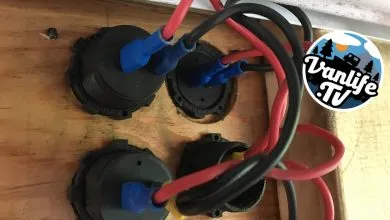
Then I attached the cables to the relay, and screwed it in place on the woodwork. The cables have to be the right way round going into the relay, but there is a handy sticker in the relay to tell you which way round it is. (see the pic in the gallery below) The relay also has a ground wire, and I earthed this in the same place as the earth for the leisure battery, which in this case was a bolt on the driver seat!
With all the cables in place, the final thing to do was to connect them to the main battery, and the leisure battery. With this done I then installed the fuses into the fuse holders. After double checking everything, I started the engine!
Success! The relay made an audible “click” and a light appeared to indicate it was working correctly. The leisure battery was now being charged. The final thing was to turn the engine off, and make sure the relay disconnected the battery’s – again it worked perfectly.
All that was left to do was tidy up the cabling, secure them with the supplied zip ties and bolt the passenger seat back in place. Job done!
Take a look through the photo gallery below for the main points covered in this article


Really helpful! Thanks
Hey guys i realy need help. Im realy worried about this.. i have battery under driver seat in vw t4 2001
And when i turn of the engine and go to sleep in back… the baterry have noises and the battery is hot… i dont know why all conponents is turn off…van is off..? Im worriet about to explode or something? What can this be… car have webasto, seat heating.. but when i go to sleep is all turned off… please help… me and my darling was worried about… we buy this van 3 monts ago
I would get a new battery mate – can’t be too careful.