
Ive been wanting to install a hammock in the van for some time, but never got around to doing it. But now I have, and here is how I did it!
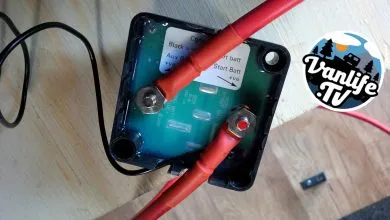
Firstly, you are going to want to install the eye bolts into the main body structure of the van.
Its got to be solid, there’s no point in installing it into your wood cladding – it just wont be strong enough to take the weight of a person. The last thing you want is the hammock pulling out the eye bolts, and you come crashing to the floor!
Choosing your eye bolts
You will also need to make sure the eye bolts are up to the job as well. A nice neat solution is to use motor-sport seat belt eye bolts. These eye bolts are designed to take a lot of strain, and are rated to 8.8 tonnes!
Installing the hammock
The longest distance in any van is across the diagonal. So that’s where I decided to place the hammock. Just above the cab is a strengthening beam that I had secured the wood cladding too. So all I had to do was drill through the cladding, and into the metal beam. The problem came when my right angled drill bit became too long to fit in the space required.

As you’ll see in the video above, I needed to get the hole out to 12mm – but that wasn’t going to happen using a drill bit. So I had to use a cone cutter to bring the size of the hole out to the right diameter. Much to my surprise it actually worked, and I was able to secure the eye bolt into place! Luckily there was an access hole to allow me to get the backing plate into the beam to secure the eye bolt.
Securing the hammock to the back of the van was easy in comparison. I just needed to drill the hole into the rear door pillar – which was double thickness metal, so would be really secure. Again, a handy access hole made it easy to get the backing plate into the pillar. I ended up installing a second rear eye bolt into the other door pillar to give me options to which side I want to attach the hammock when the rear doors are open. The other end of the hammock can then be attached to a nearby tree or lamppost etc.
So then came the moment of truth, would the hammock collapse under my weight, would the eye bolts do their job and hold me? In short – yes. But it was a nerve-wracking time as I eased myself into the hammock for the first time.

The hammock
Now a word about the hammock, it’s a simple hammock that came with everything you need including adjustable cords and carabiner clips already attached. The hammock was bargain at approx £15 from Amazon.
I then used some of my old climbing carabiners to attach it to the eye bolts. This meant I have infinite adjustment to the height of the hammock to maker sure it clears the edge of the bed.
So there it is, a simple install of a hammock into my campervan. And I tell you what, its bloody comfortable. Up until now, my mates who sometimes accompany me on road trips have had to sleep on the floor of the van, but at least now they will have the choice of a hammock – and Im sure they’re bloody pleased about that :)
Do you have any questions or comments about the install? You can leave them in the comments section below, or the video comments on YouTube.

How long is the distance between to 2 bolts?
Cheers
G
Hi, One thing confuses me. Will I have a problem with thermal bridging if I connect a metal bolt to the metal body of the van? Thanks a million for your help and publishing your advice.